Windows 版 Clash Verge 下载 (两个任选其一)
macOS / Linux 用户:从官方下载页选择对应系统的版本。
中文教程
下载并安装
从上方任一地址下载:国内备份是 zip 压缩包,解压后运行里面的安装程序;官方页则选对应系统的安装包。装好后打开 Clash Verge。
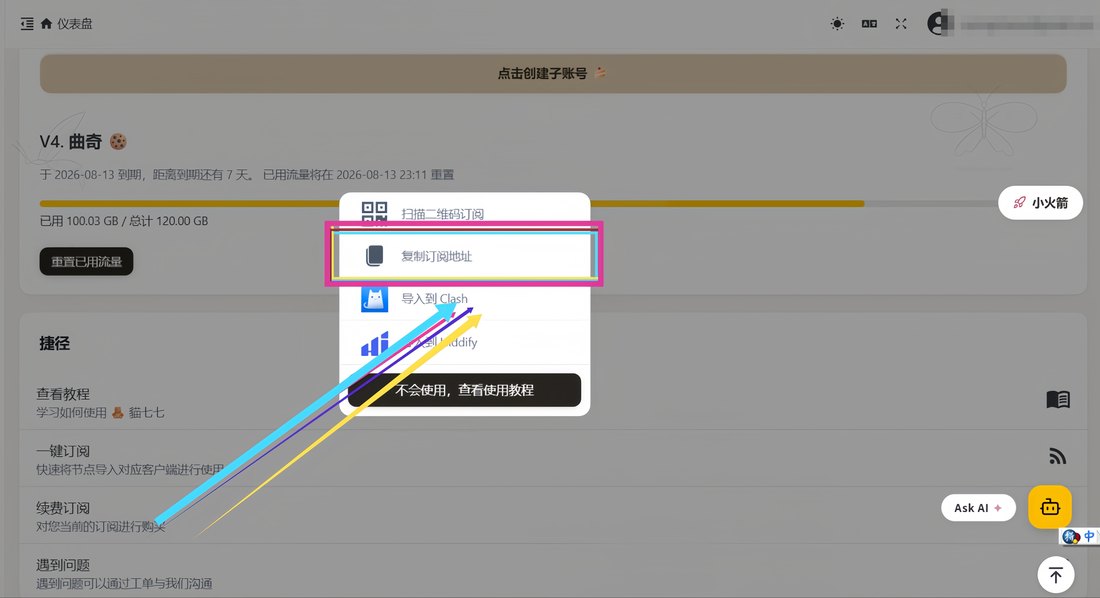
复制订阅链接
登录用户面板 neko77.best,在订阅区复制你的 Clash 订阅链接。
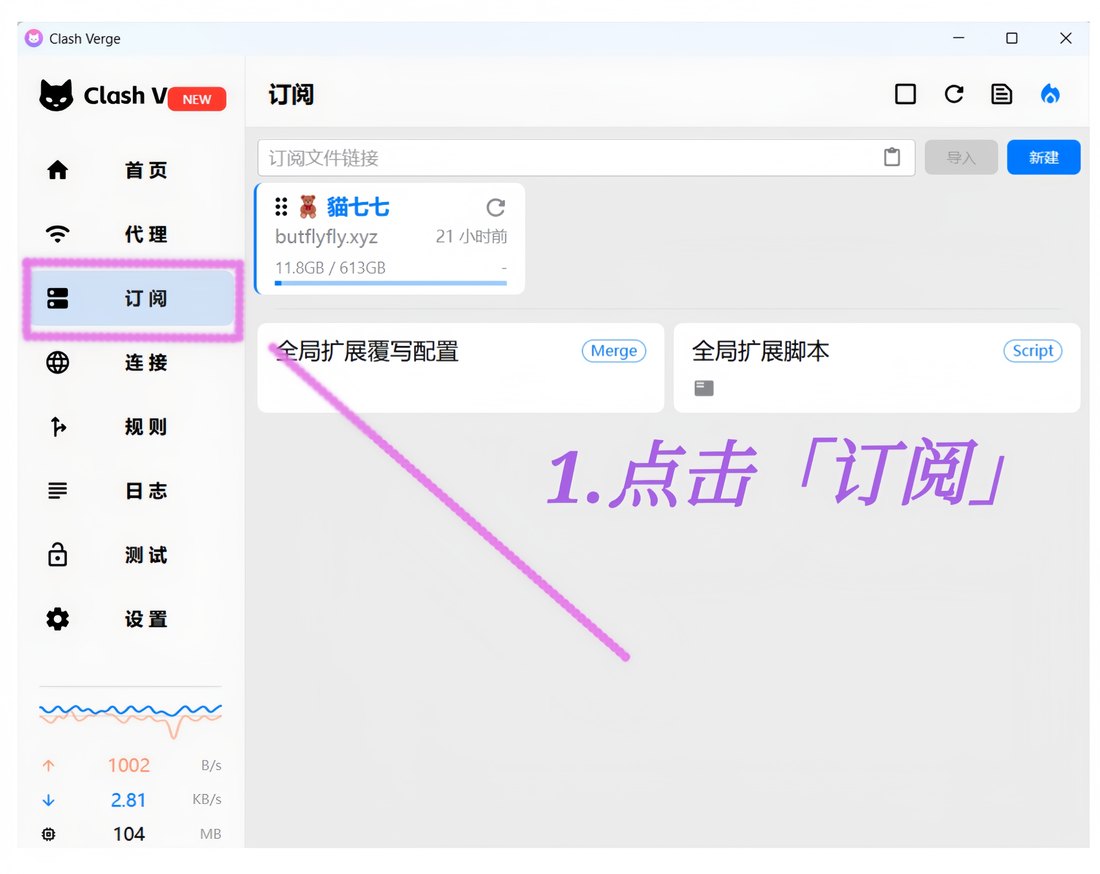
打开 Clash Verge
打开装好的 Clash Verge,点左侧菜单的「订阅」。
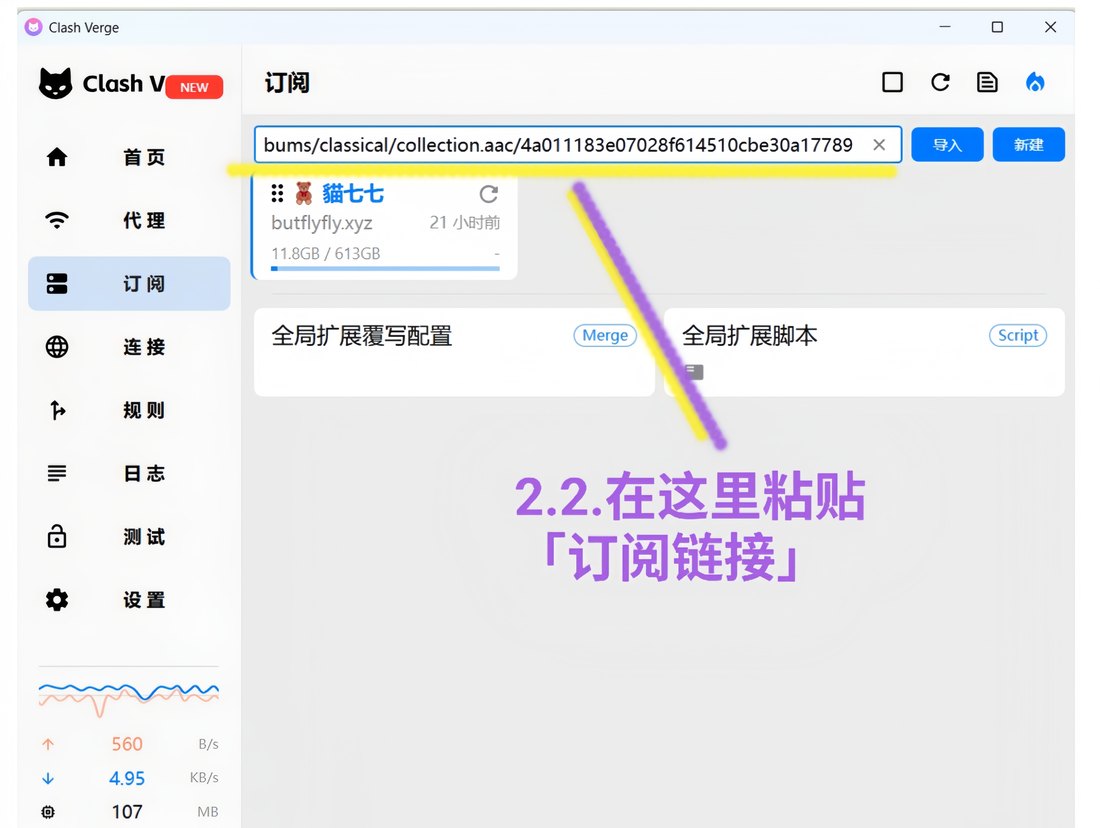
粘贴订阅链接
刚复制的链接,粘进顶部输入框。
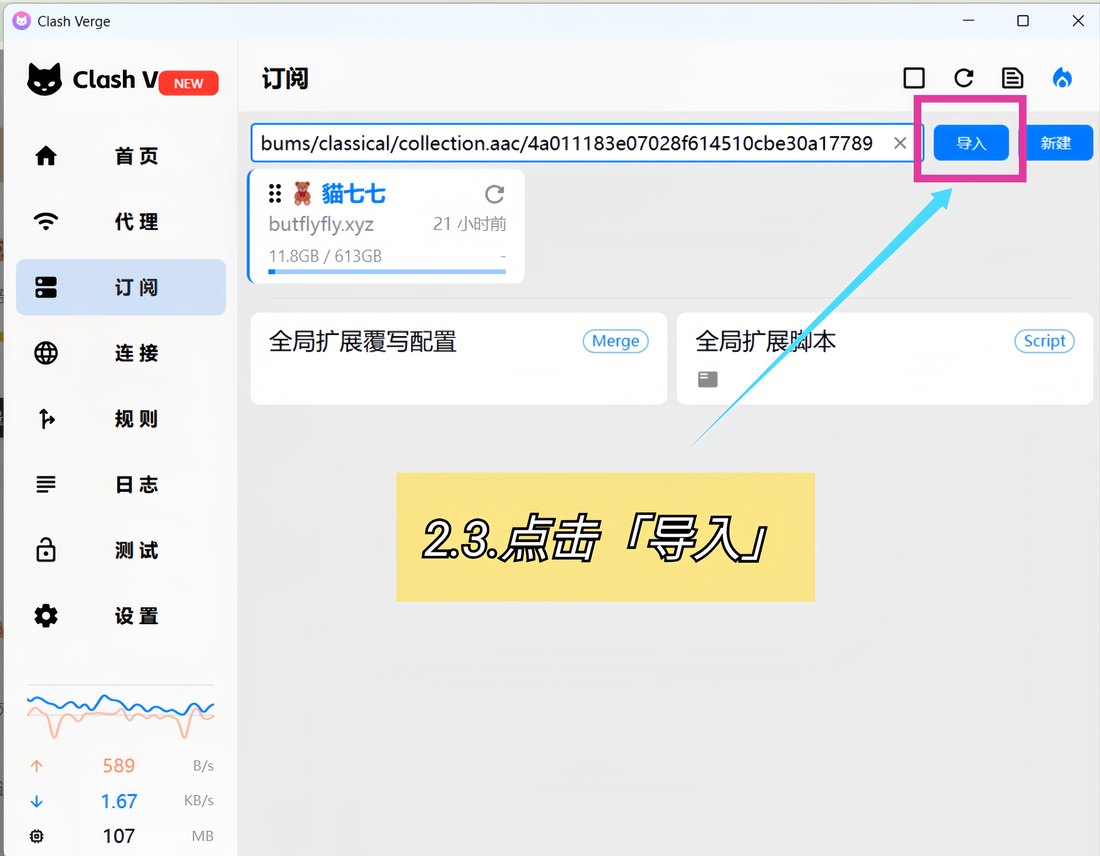
点「导入」
点右侧「导入」。
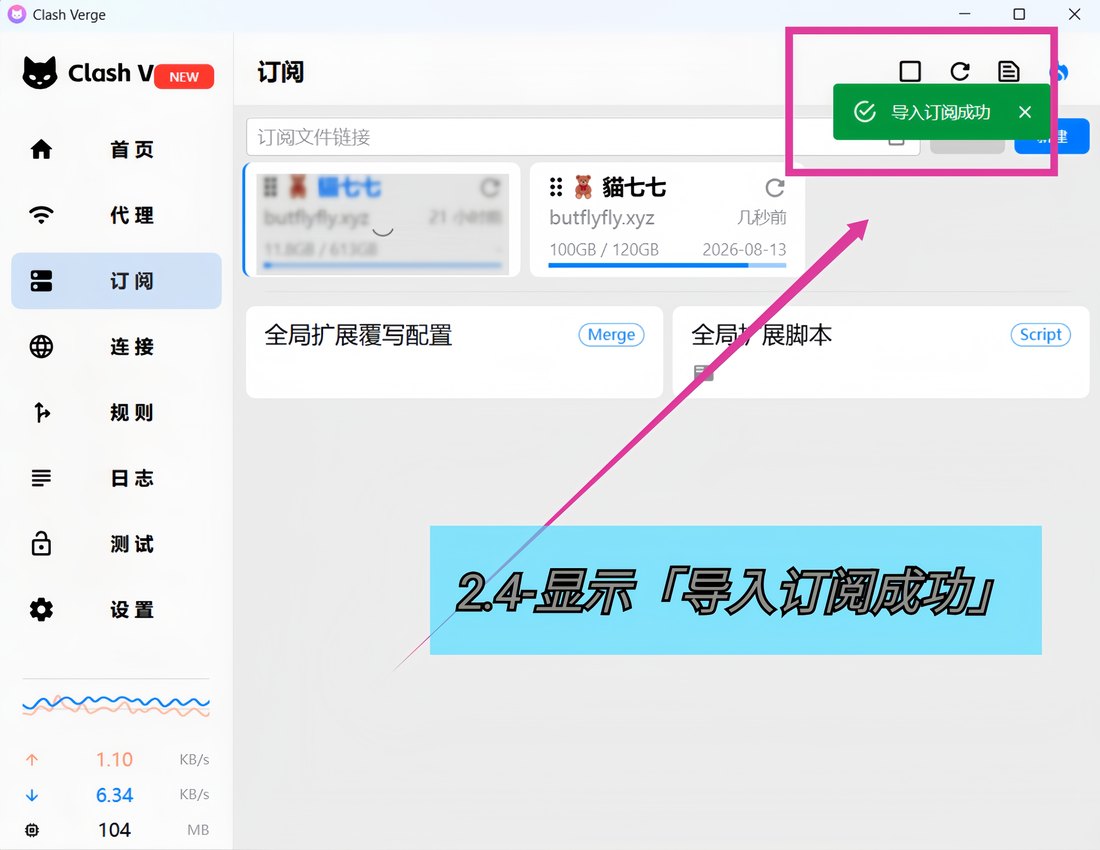
导入成功
右上角弹出「导入订阅成功」,订阅卡片出现,即成。
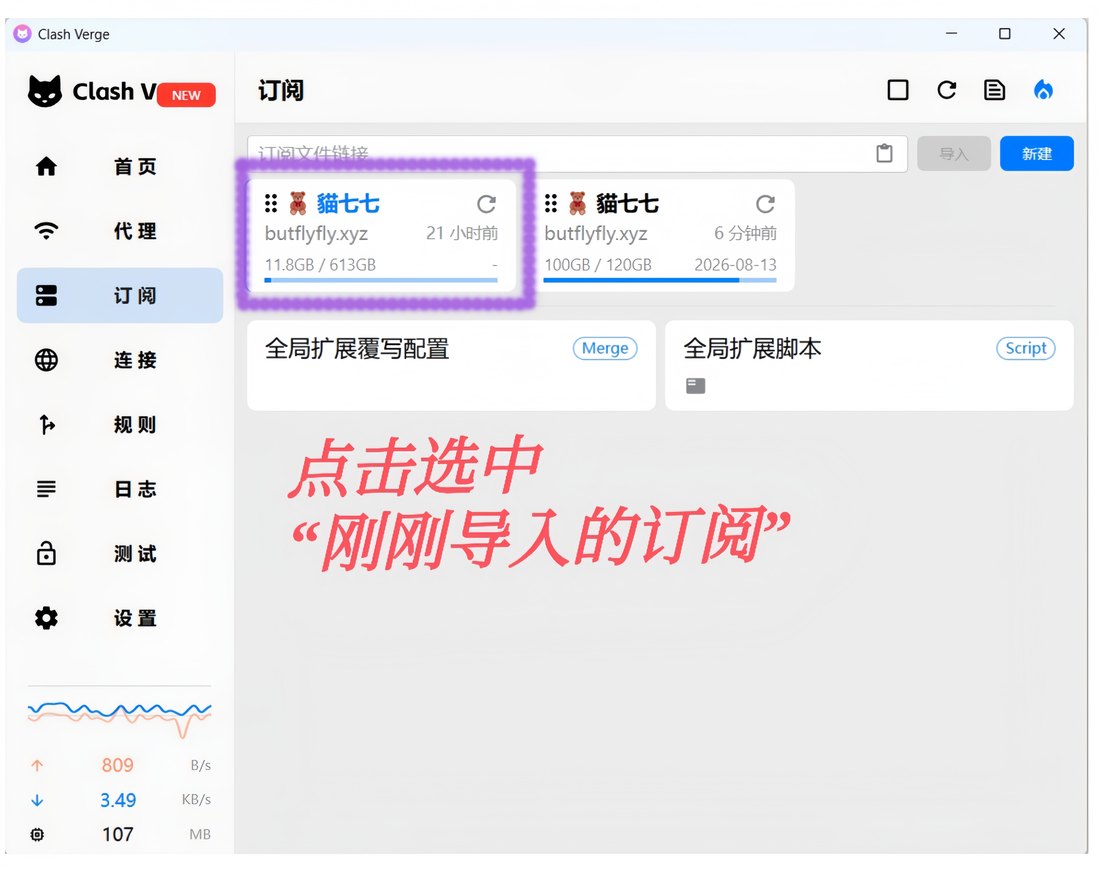
启用配置
点一下刚导入的那张订阅卡片,设为当前配置。
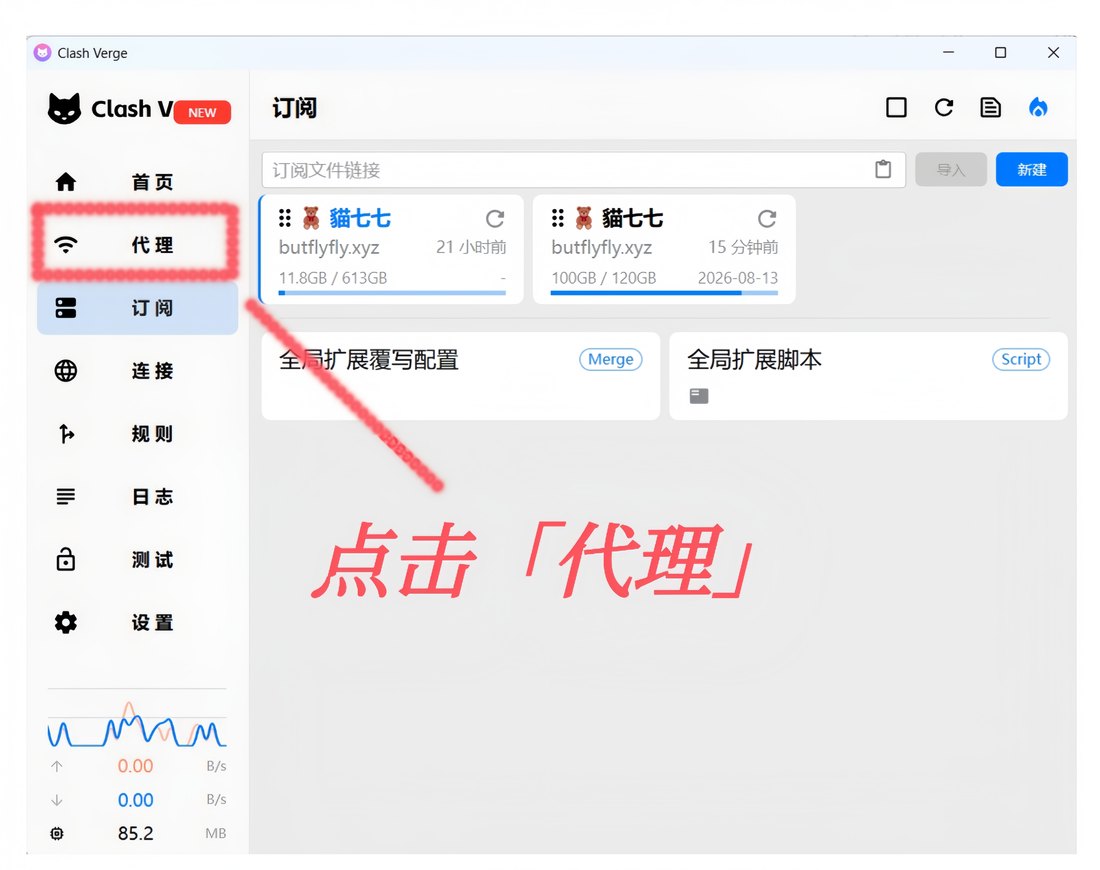
打开代理页
左侧菜单点「代理」。
测延迟
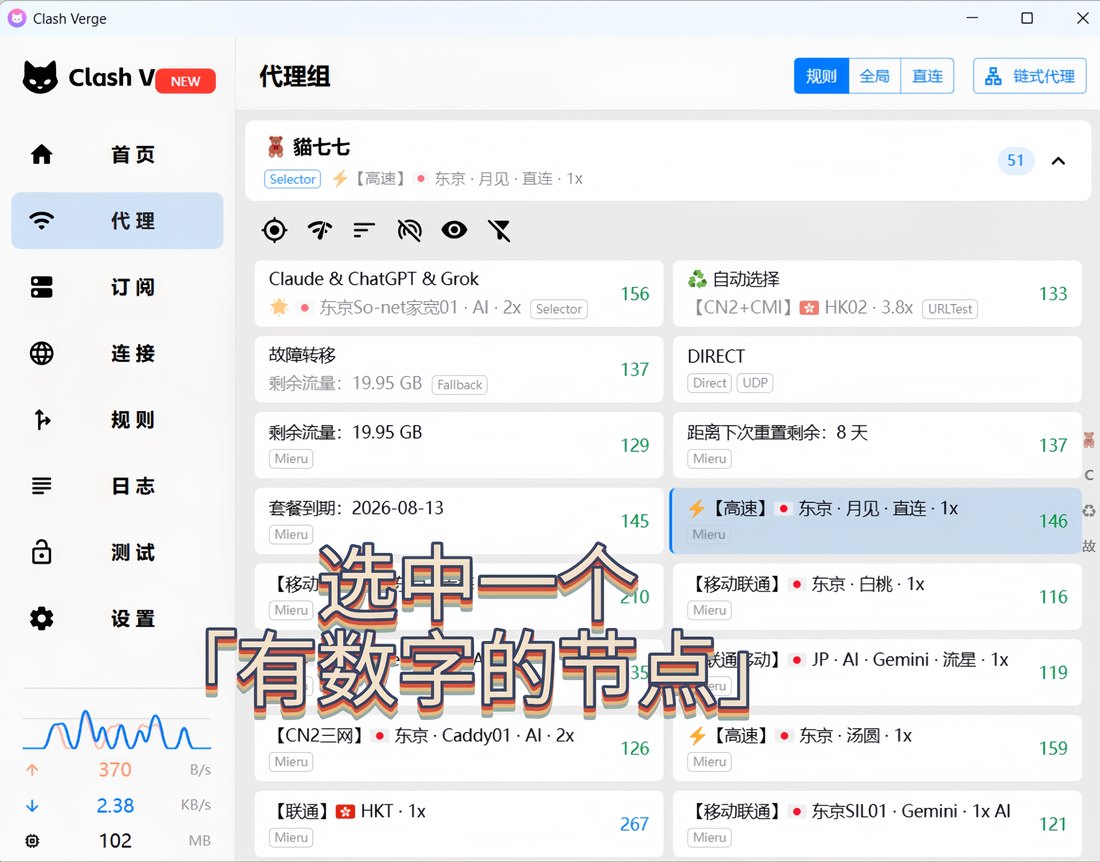
点测速图标,等数字出来。
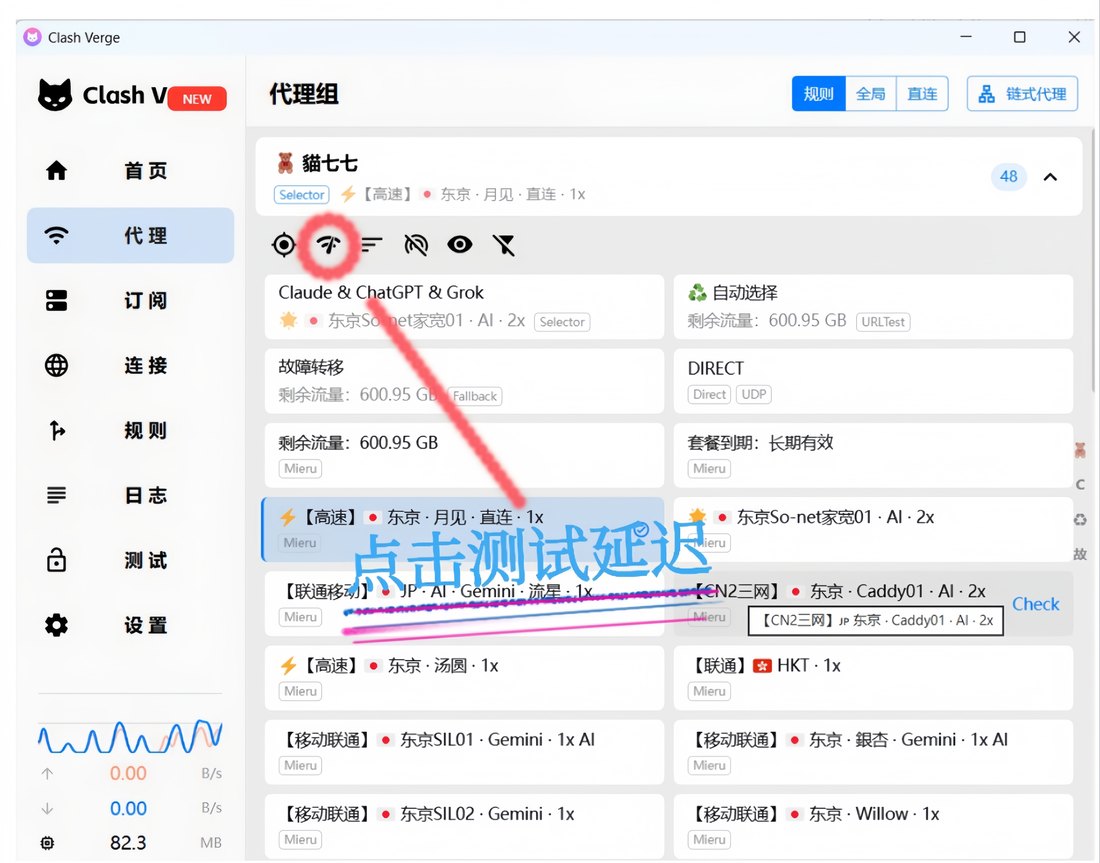
选中节点
挑一个「有数字」的节点——有数字才是通的,数字越小越快。
打开设置
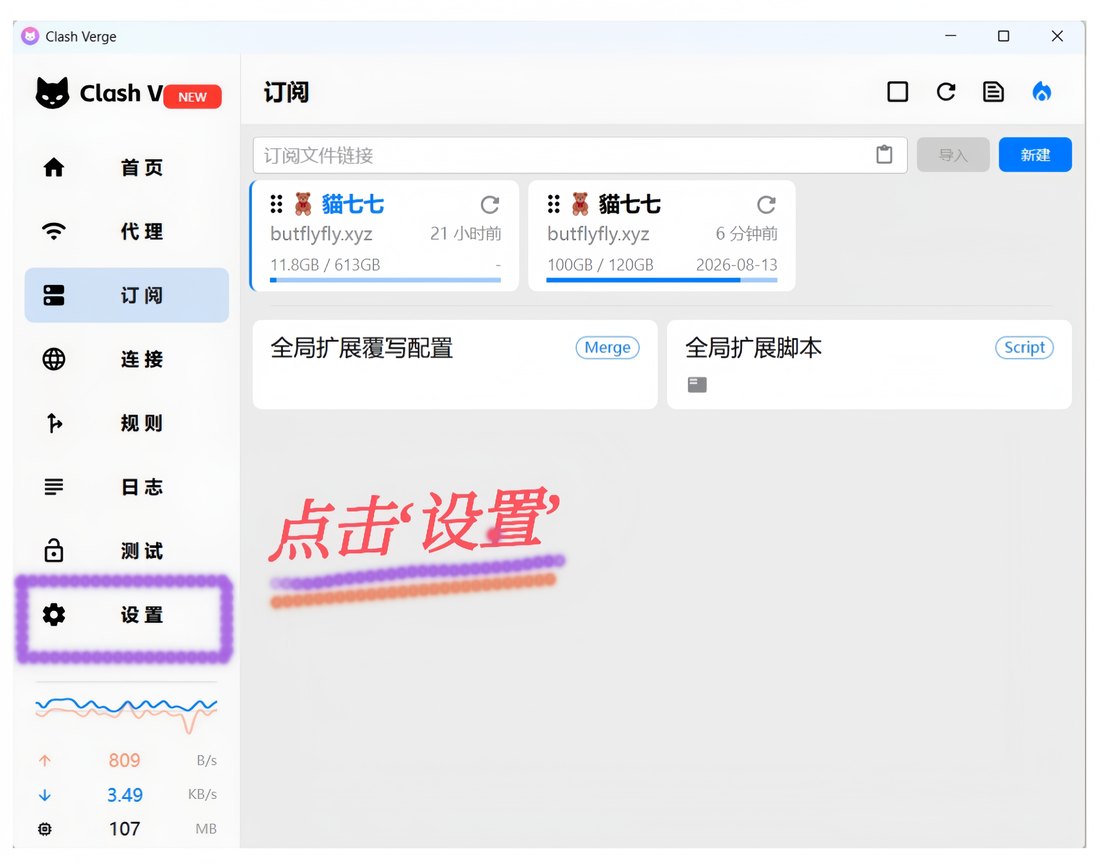
左侧菜单点「设置」。
开启系统代理
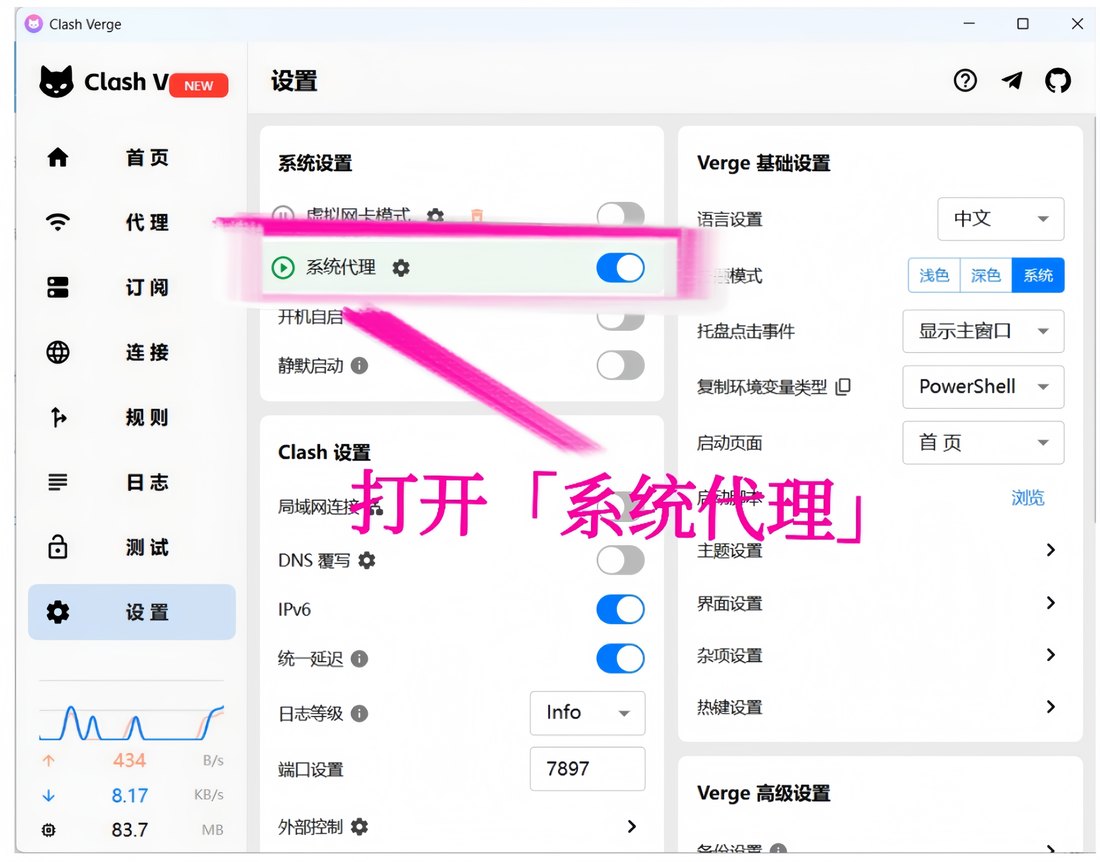
打开「系统代理 / System Proxy」开关。要全局接管,可改用 TUN 模式。
测试连接
打开浏览器访问一个外网站点,能打开即成。
完成
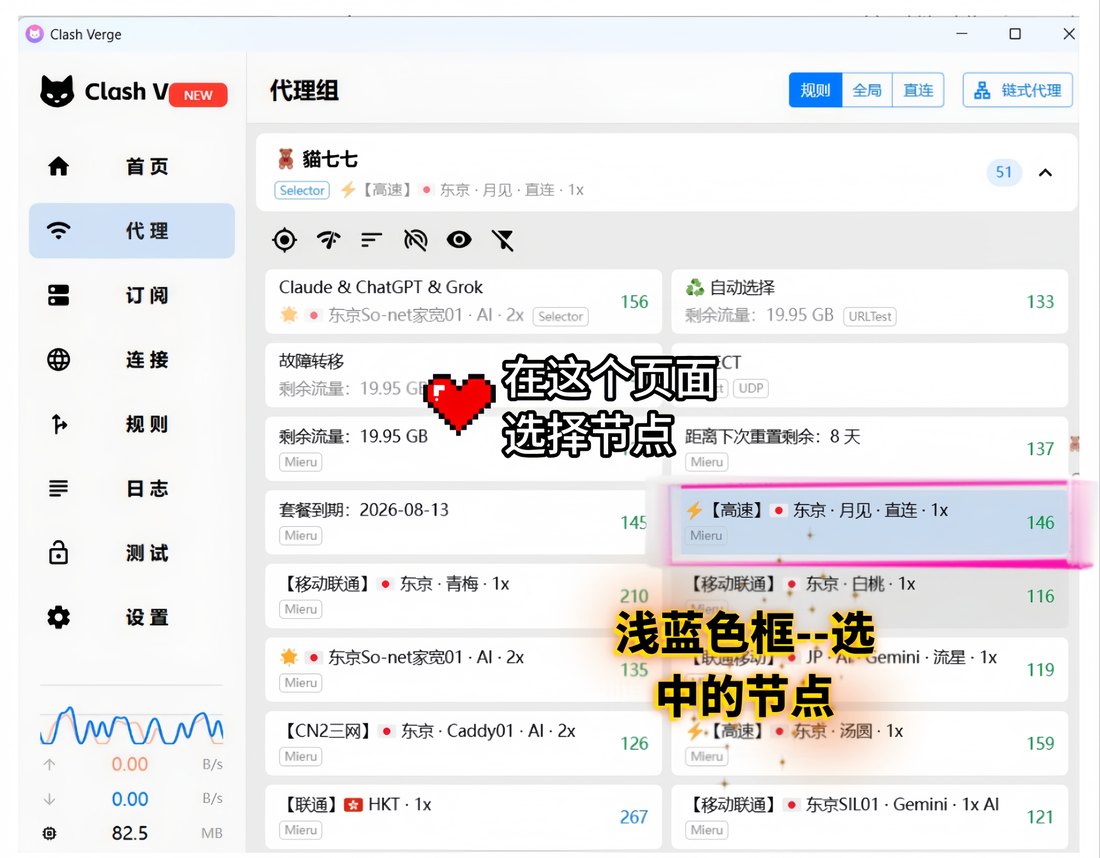
到此即可正常使用。浅蓝色框就是当前选中的节点,换节点随时回「代理」页点选。畅游愉快。
进阶 · 用得上再看
虚拟网卡模式(TUN)
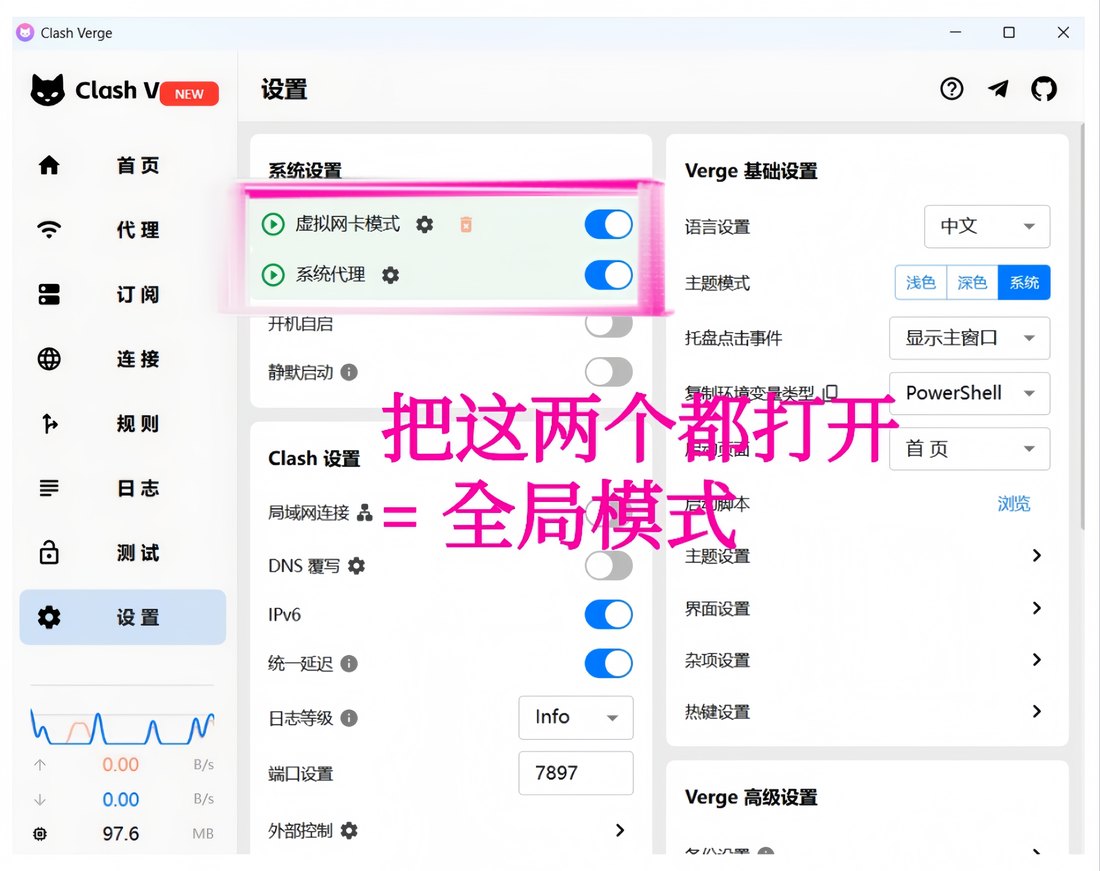
「系统代理」只管浏览器这类听话的应用;游戏、命令行这些不认系统代理的,要靠 TUN——在系统里装一张虚拟网卡,所有流量都从它过,谁也逃不掉。
开关就在「设置」里「系统代理」上面。首次开启会提示安装服务,同意即可;开不起来,就右键用管理员身份运行 Clash Verge。
全局模式:全部流量都走 Clash
把「虚拟网卡模式」和「系统代理」两个开关都打开,整台电脑的流量就全交给 Clash 接管。日常开「系统代理」就够;有应用死活不走代理时,再把 TUN 也打开。
另外「代理组」页顶上的「规则 / 全局 / 直连」是分流开关:日常保持规则(国内直连、国外走代理);个别网站打不开可临时切「全局」,用完记得切回来,不然国内网站也绕路变慢。
它是怎么工作的
订阅链接是一张节点清单的网址,更新订阅=去拿最新清单。
mihomo 内核在你电脑里开了个中转站:流量先进中转站,按规则分拣——国内的直接放行,国外的交给你选中的节点加密送出去。
一句话:订阅是地图,规则是路牌,节点是路。地图旧了更新订阅,路堵了换节点。
常见问题
打开是白屏 / 闪退 / 只剩托盘图标?
缺 WebView2 运行库(精简版系统常见)。去微软官网搜「WebView2 Runtime」装上再开。
Windows 拦截说「无法运行」/ 报毒?
代理软件常被误报。点「更多信息 → 仍要运行」,或在 Defender 里放行。
开了系统代理,网页还是打不开?
回「代理」页:挑一个有数字的节点;都没数字,点测速图标刷新再挑。
游戏 / 某些 App 不走代理?
开上面的虚拟网卡模式(TUN)。
更新订阅失败?
先选一个能用的节点再更新;还不行,回面板重新复制订阅链接,从第 2 步再来一遍。
浏览器装过代理插件?
SwitchyOmega 这类插件会和系统代理打架,先停用它们。
English Guide
Download & install
Grab the build from one of the links above (the CN mirror is a zip — unzip and run the installer inside), then open Clash Verge.
Copy your subscription link
Log in to the user panel (neko77.best) and copy your Clash subscription URL.
Open Clash Verge
Launch Clash Verge and click Profiles in the left sidebar.
Paste the link
Paste your subscription URL into the input field at the top.
Click Import
Click Import next to the input field.
Import succeeded
A green toast confirms it; the new profile card appears.
Activate the profile
Click the profile card to set it as the active configuration.
Open the Proxies page
Click Proxies in the sidebar.
Test latency
Tap the latency-test icon and wait for the numbers.
Pick a node
Choose one that shows a number — a number means it works; lower is faster.
Open Settings
Click Settings in the sidebar.
Enable the system proxy
Turn on System Proxy. Use TUN mode if you need full traffic capture.
Test the connection
Open any blocked site to confirm it works.
Done
You're all set — the light-blue card is your current node. Switch anytime from the Proxies tab. Enjoy.
Advanced · optional
TUN mode
System proxy only covers well-behaved apps like browsers. Games and CLI tools need TUN — a virtual network adapter that captures everything. The switch sits right above System Proxy in Settings; approve the service install on first use, or run Verge as administrator.
Full takeover ("global")
Turn on both TUN and System Proxy and the whole machine goes through Clash. Day to day, System Proxy alone is enough. The Rule / Global / Direct tabs on the Proxies page are the routing switch — stay on Rule; flip to Global only when a site refuses to open, and switch back after.
FAQ
Blank window / crash on launch?
Install the Microsoft WebView2 Runtime.
Windows blocks the installer?
"More info → Run anyway" — a common false positive for proxy apps.
Proxy on but pages won't load?
Pick a node that shows a number; re-run the latency test if none do.
Some apps bypass the proxy?
Enable TUN mode above.
Subscription update fails?
Select a working node first, or re-copy the link from the panel and re-import.